Showing posts with label quick piecing. Show all posts

Tuesday, 17 April 2018

Story of a Quilt - Ripples in the Sand

This quilt has been in the making for quite some time. The fabrics arrived in stock in my quilt shop in July 2017. I even started making the quilt that same month and had the finished quilt top on display on my stand at the Festival of Quilts last year.


But for some reason, I didn't get around to quilting it. Until a couple of months ago.

I think the impetus to finish came about because I decided to use it as a filler project for the magazine. And I'm so glad I have finished it as I love it. I haven't quilted it as densely as I usually do, with the result that it's a lot softer and snugglier than some of my other recent quilts. A lesson to self there maybe? It's still quilted enough to create dimension and interest though.


The fabrics are from a collection called Sand in my Shoes designed by McKenna Ryan for Robert Kaufman. I love how they seem to blend with each other so I wanted to create a block that would reflect that and allow the colours to flow.

A mixture of different sized HSTs and I had the design I wanted. Something fairly simple but looked a lot more interesting once the fabrics played their part, which is my raison d'etre when it comes to designing quilts for my shop.

Mirror image blocks in alternate rows helped create that flow.


I like to use most of the fabrics from a collection if I can as hopefully that will mean they sell more evenly so this quilt used 17 of the 27 fabrics in the collection. The ones I didn't use were the ombres and a couple of other scene-type fabrics.
I auditioned several of the ombre prints for the inner border in a post you can read about here, and plumped for the bright green ombre which is the Meadow colour.

To echo the flow of the quilt, I quilted it in freehand wavy parallel lines, like ripples in the water. This may end up being the last quilt I quilt on my trusty old New Home Janome. It's served me well over the years, but thanks to a recent big birthday, I've upgraded to a Janome Atelier 3 which has a much bigger throat.


I backed the quilt with one of the fabrics from the collection. Quilting thread was King Tut #905, Baby Blankets and the wadding, Hobbs Heirloom 80/20. The binding is the same green (Meadow) ombre used in the inner border.


The quilt was featured in the April 2018 issue of P&Q.

Saturday, 3 February 2018

Story of a Quilt - Chroma

Chroma is the latest collection of handcrafted batiks designed by Alison Glass for Andover Fabrics. I often see fabric collections online and slowly fall in love with them. Such was the case with Chroma.

It was quite a slow burn in fact and the quilt I've loved the most that Alison designed with the fabrics was a simple one of squares joined together.

I finally took the plunge and ordered the whole collection, all 27 bolts! They're listed in my online shop.


I felt that a quilt made from this collection needed to use most, if not all, of them so I decided to make a really quick quilt which used all but one of them. I also felt the fabrics needed to be able to speak for themselves so decided on a large-scale HST quilt harking back to that favourite Alison Glass design. I would have made the quilt in a matter of days if it weren't for feline helpers!

Helping with the layout

Helping press the backing

Double trouble helping with the quilting


I'm really happy with the finished quilt; it's got a lovely glow about it. The finished size is 63" square. The HSTs are 9" square. I backed it with an AG Sunprint I had on the shelves and quilted it using King Tut 918, Joseph's Coat. The wadding is Hobbs Heirloom 80/20.


The quilt will appear as a project in the February 2018 issue of P&Q. It's my current favourite quilt, of course!


Wednesday, 31 May 2017

Story of a Quilt - Blue Sky over Ohio

I thought it was about time I started making proper 'journal' type records of my quilts as I finish them. I used to keep a paper record with the date a quilt was finished, it's size together with a photo of the quilt. Sometimes I'd stick scraps of the fabrics used in the quilt too.

Of course, this fell by the wayside a long LONG time ago!

And really this blog was supposed to be a digital record of my quilt making, amongst other things.

So, here goes. A new set of blog posts titled 'Story of a Quilt'. And first up is Blue Sky over Ohio.

A lot of my quilt designs evolve as I make them. I was sent these Blue Sky fabrics from Makower so I could make a project for the magazine. I originally intended to create a shaded basket weave type design with the prints, and arranged them in a shaded order.


However, I saw a strippy design online and decided on a rethink.

I can't quite remember how I fell upon the Ohio Star block as the block to use; I think it was because it was a traditional block that we hadn't featured for a while. It also happens to be one of my favourite blocks.

I figured I could still create a shaded effect with the blocks by using the lighter fabrics at the centre, shading outwards towards the darker fabrics.

And so the design was born. The blocks are 6" square and are machine pieced using quick piecing quarter square triangle units for the star shapes.


The quilt was made bigger by alternating the blocks with 6" squares, still following the shaded effect.

The background of the quilt was machine quilted for speed in a stipple pattern leaving the stars to 'pop'. If I'd had more time and was hand quilting it, I would have quilted it differently. The thread was King Tut quilting thread Brooklet (951). Wadding is Hobbs Heirloom 80/20 and the backing was Duck Egg Linea from Makower. The edges were bound with strips cut from the cream star fabrics.

Finished size: 66" square

And I have to say, I'm pretty please with it!

Wednesday, 2 April 2014

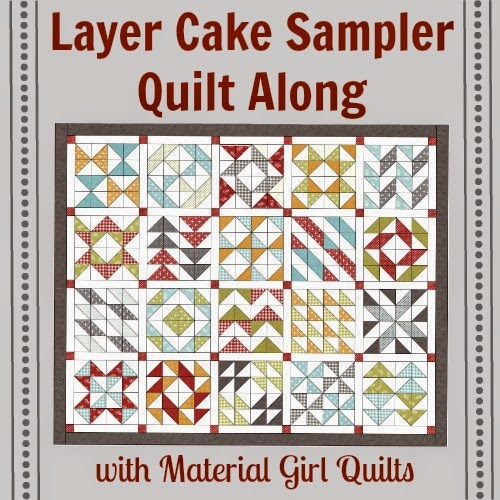
Layer Cake Sampler Quiltalong

I've been having fun taking part in this quiltalong designed and organised by Amanda at Material Girl Quilts. Every Friday Amanda has been releasing two new blocks and we've just passed the halfway point.
 
All you need to make the quilt is a layer cake of forty 10" squares and background fabric. This is what the finished quilt will look like
 
 
I decided to use a Splash Cracker pack which is Hoffman's version of a Layer Cake. However, I couldn't decide which background fabric to use; light or dark. So I decided to be a bit different and use both
 

I like to be a bit different every now and then. I'm a kind of 'What if.........' quilter.

So here are my blocks up to block 12, in sets of four. The finished size of the blocks are 16" square and I don't have a design wall or space big enough for all of them at once!


Blocks 1 to 4


Blocks 5 to 8
 
 
Blocks 9 to 12

I'm loving how my points are meeting nicely, I think because you trim the HST units before joining them. And I'm quite pleased with how using two fabrics for the background is working. It is meaning that I'm needing to think about the best arrangement for the blocks each time. Amanda gives you a couple of alternative layouts for each block too.

So only eight more blocks to go!

And finally..........you know I said I was a 'What if' kind of quilter? I thought I would make some more blocks using one of the Hoffman 1895 pre cut packs which are plainer fabrics and use a patterned batik for the background......and here are blocks 1 and 2 using Taffy


 Oh...........and I'm using a 5" charm pack instead of a layer cake so the HSTs are trimmed to 2" square making the finished blocks 6" instead of 16". I think they will all be quite cute!

Linking up with Amanda's halfway blog post and giveaway
 

Sunday, 2 March 2014

Full of the Joys of Spring part 2 - and a tutorial!

So the rest of my day yesterday was spent sewing.
 
And yesterday I made a quilt top! It was so quick and easy I've put a quick tutorial together as I'm thinking it has the possibilities to be as good as the #scrappytripalong that is all the rage online.
 
One of the marketing girls at the offices gave me a charm pack of thirty two 5" squares that are subscription gifts for a Sewing for Pleasure show the magazine is attending in a couple of weeks.
 
'What can you do with this?' she asked.
 
I wasn't immediately struck with inspiration but as usual the creative juices starting flowing and I have come up with this. It measures 38" square but if you kept adding blocks you could make a bed-sized quilt really quickly.........and use up a lot of scraps. You don't have to use one background colour either like I have done here, which would use even more scraps up!
 
 
I'm calling it a #scrappychurndash and here's how you make it.
 
What you need:
Assorted 5" square scraps or a charm pack
Matching background or assorted light or dark scraps. I used calico.
 
Cutting:
1. Cut 5" strips from your background and sub cut these into 5" squares.
 
Method:
1. Take one, 5" background square and cut it in half to make two, 2.5" x 5" rectangles.
2. Join these rectangles to opposite sides of one, 5" scrappy square. Press seams towards scrappy square.
 
 
3. Take one, 5" scrappy square and cut it in half to make two rectangles as before and join them to opposites sides of one, 5" background square. Press seams towards scrappy rectangles.
 
 
4. Cut this second pieced strip in half to make two, 2.5" x 9" rectangles.
 
 
5. Place these pieced rectangles on opposite sides of the first pieced strip.
 
 
6. Join the strips together to complete the block. It should measure 9" square (finished size 8.5" square) and the seams should nestle nicely because you have pressed them in opposite directions.
 
And hey presto one very quick and easy block!
 
 
What do you think? Want to play along too? If you do, tag your images #scrappychurndash
 
Joanna